Google+

Friday, January 14, 2022

SOLVED - Error "Unable to resolve dependency tree" while running npm install

 In this article we review how to fix the Error "Unable to resolve dependency tree" while running npm install  using Angular 12,  error that looks like this :


Solve the Error "Unable to resolve dependency tree" while running npm install  using Angular12


This error is rooted on an npm 7 bug, therefore one solution would be to use npm 6 for now, that means, downgrading to npm 6 , like this:
npm install -g npm@6.14.15

Another solution, without touching NPM, would be to change versions of the Angular dependencies of your app.
Certainly, the present error can happen whether while you are creating a brand new Angular client app, or later on, while running npm install on your app. 
On both cases, you can open the package.json file, and look for the devDependencies section, like this :


Here on this section, change the version of the "jasmine-core" and the "karma-jasmine-html-
reporter" , like this:


Open the terminal and run again the NPM I or npm install command, and everything will get right.
Now you can run ng serve -o, and browse to your app.

That's All!!! 
Enjoy Angular.....

      by Carmel Schvartzman

כתב: כרמל שוורצמן


Friday, July 16, 2021

Using BehaviorSubject in Angular 12 : differences between Observable VS Subject VS BehaviorSubject

 In this article we review how to use BehaviorSubject in Angular 12 : and also the differences between Observable VS Subject VS BehaviorSubject.


Using  BehaviorSubject in Angular 12 : differences between Observable VS Subject VS BehaviorSubject 


A BehaviorSubject is a kind of observable so you can subscribe to messages sent by the PUBLISHER like any other observable. 

However, BehaviorSubject allows you to control the messages as well, and emit messages at observer's will!!

 In addition, BehaviorSubjects are multicast. A Subject or a BehaviorSubject are like an Observable, but can multicast to many Observers, while plain Observables are unicast (each subscribed Observer owns an independent execution of the Observable). 

That way, Subjects are like EventEmitters: they maintain a registry of many listeners.

Upon subscription, BehaviorSubject  returns the last value kept. However, a regular Observable or a Subject, only trigger when they receive an "NEXT" operation.
For this sake, BehaviorSubject  needs a DEFAULT value upon creation, as it must always return a value on SUBSCRIPTION TIME , even if it hasn't received a "NEXT" operation call.

We can retrieve the last value of the subject in a regular non-observable code by using the getValue() method.

The difference between an Observable and a Subject is that it is an observer in addition to being an observable : you can also edit and emit and send values from a Subject in addition to subscribing to it.

Behavior subject can be turned into observable  using the asObservable() method on BehaviorSubject.


This is a BehaviorSubject  example: DEFAULT VALUE + IMMEDIATE MESSAGE ON SUBSCRIPTION:


let bs= new BehaviorSubject("1"); 

bs.next("2");

bs.subscribe(value => {
  console.log("Value received : ", value);   
  // Subscription got 2 !!!!!!!!!! However, an observable or subject wouldn's have send a message at this stage
});

bs.next("3"); // Subscription got 3
bs.next("4"); // Subscription got 4
  

And this is an example of Subject: NO DEFAULT, NO MESSAGE UNTIL "NEXT" method triggered:


let s= new Subject(); 

s.next("2");

s.subscribe(value => {
  console.log("Value received :", value); 
  // Subscription wont get  any message at this point
});

s.next("3"); 
s.next("4");  


Example of BehaviorSubject use:


Following is an example of using BehaviorSubject:  here is the app to try
These TWO components pass data one another using a BehaviorSubject from a Service:


1) First, we define the BehaviorSubject on some Service:

import { Injectable } from '@angular/core';
import { BehaviorSubject } from 'rxjs';

@Injectable()
export class MyService {
  constructor() {}
  private bs = new BehaviorSubject<string>('default');
  obs$ = this.bs.asObservable();

  editData(newData) {
    this.bs.next(newData);
  }
}


2) Then, we use it on an OBSERVER Component, like this :

import { Component, OnInit } from '@angular/core';
import { tap } from 'rxjs/operators';
import { MyService } from '../services/my.service';

@Component({
  selector: 'my-two',
  templateUrl: './two.component.html',
  styleUrls: ['./two.component.css']
})
export class TwoComponent implements OnInit {
  data: string;
  newData: string;
  tapData: any;

  constructor(private svc: MyService) {}

  ngOnInit() {
    this.svc.obs$
      .pipe(tap(d => (this.tapData = d)))
      .subscribe(d => (this.data = d));
  }

  UpdateData(user) {
    this.svc.editData(this.newData);
  }
}


3) Then, we use on the template HTML is as follows :

<p>
  Data received on Component TWO : {{data}}
</p>


JSON = {{data | json}}


4) The PUBLISHER will be the component ONE:

import { Component, OnInit } from '@angular/core';
import { MyService } from '../services/my.service';
@Component({
  selector: 'my-one',
  templateUrl: './one.component.html',
  styleUrls: ['./one.component.css']
})
export class OneComponent implements OnInit {
  data: string;
  newData: string;

  constructor(private svc: MyService) {}

  ngOnInit() {
    // receive data back:
    this.svc.obs$.subscribe(d => (this.data = d));
  }
  UpdateData() {
    // send updated data
    this.svc.editData(this.newData);
  }
}


<p> Data sent from component ONE : <br />
  {{data}}
</p>
<input [(ngModel)]="newData"/>
<button (click)="UpdateData();">Update Data</button>

5) And both components will be used on the App.Component :


<p>
  Publish Data from Component ONE to Component TWO
</p>

<my-one></my-one>
<my-two></my-two>

This way, both components are interconnected and pass the data on the fly each another.
( See the code on   stackblitz.com )


That's All!!! 
This post was about BehaviorSubject in Angular 12 : differences between Observable VS Subject VS BehaviorSubject.
Enjoy Angular.....

      by Carmel Schvartzman

כתב: כרמל שוורצמן 

Friday, June 25, 2021

SOLVED : How to fix Angular 10 Ionic ERROR "NullInjectorError: No provider for Contacts!" on Ionic 5

 In this article we review how to  fix Angular 10 Ionic ERROR "NullInjectorError: No provider for Contacts!"  on Ionic 5,    looking like this :


 How to fix Angular 10 Ionic ERROR "NullInjectorError: No provider for Contacts!"  using Ionic 5


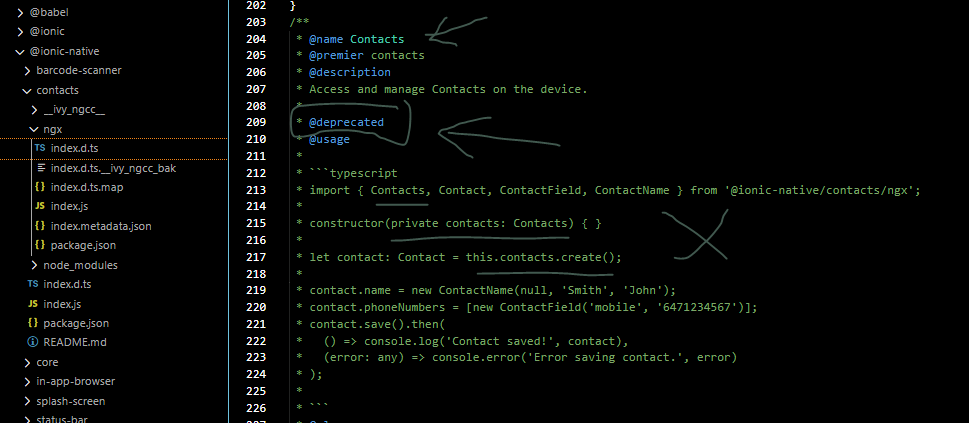
After you received this error, you'd probably take a look at the documentation on the official website of Ionic, and on the Github repository for the Contacts component:

https://www.npmjs.com/package/@ionic-native/contacts
https://ionicframework.com/docs/native/contacts#usage

But the problem is also there: the documentation is not up to date.


You can copy-paste all pieces of source code as you move forward through this Tutorial, or elsewhere you can download the entire Angular code from the following URL:

That's All!!! 
Enjoy Angular.....

      by Carmel Schvartzman

כתב: כרמל שוורצמן

Friday, June 11, 2021

SOLVED - how to solve the error " there is no package called ‘bslib’ " on Heroku deployment from GitHub repository

 In this tutorial we'll learn how to solve the  error " there is no package called ‘bslib’ " on Heroku deployment from GitHub repository  . 

This error occurs while deploying an app to Heroku from a GitHub repository . Your app works perfectly on your development machine, but it would fail on deployment, like this :


Step by step how to  solve the error " there is no package called ‘bslib’ " on Heroku deployment from GitHub repository  


First of all, notice that it seems to be an ENCODING problem : something does not look good with these symbols :  " â€˜bslib’ "

So probably you just have been trying of changing the encoding for your files, also at your machine or uploading again the files to your repository at GitHub.

However, nothing seems to help.

But if you take a closer look, the error states "...NO package called..."  : the PACKAGES are not there.

And inside the word  â€˜bslib’  you can realise the name of the unknown package .

So check whether you are loading this package :


In case you are not loading it, just add it to the setup installations : 


So, redeploy and take a look again: the app is now working:


That's all.... 
In this tutorial we've seen how to solve the  error " there is no package called ‘bslib’ " on Heroku deployment from GitHub repository  .
Happy programming.....
      By Carmel Shvartzman

כתב: כרמל שוורצמן


Friday, December 4, 2020

SOLVED - "An ERROR ocurred while running subprocess cordova" with Angular 9

In this article we review how to solve the error "An ERROR ocurred while running subprocess cordova"  using Angular 9 on Ionic 5,  on an Angular Application that includes references to cordova framework, looking like this :


How to solve the error "An ERROR ocurred while running subprocess cordova"  using Angular 9 on Ionic 5 

Fortunatly, the error message contains a hint about what to do:


To solve the problem, we'll have to re-install Gradle. 
Create a new directory C:\Gradle with File Explorer.
Download Gradle and unpack the Gradle distribution ZIP into C:\Gradle using an archiver tool.


The next step is to configure your system environment, editing the "PATH" environment variable like follows :
Click on "Edit" to edit the "Path" variable, and add the following path to it:
C:\Gradle\gradle-6.5.1\bin


Next, before you try again to compile the app, CLOSE the cmd.exe console, so that it re-reads the now updated environment variables. Compile again :


That's All!!! 
Enjoy Angular.....

      by Carmel Schvartzman

כתב: כרמל שוורצמן

SOLVED - How to Move Apps to SD Card on Xiaomi Mobile Phones

 In this article we review how to Move Apps to SD Card on Xiaomi Mobile Phones. 

After some months of use, users would wish to move MIUI and downloaded apps to SD cards in order to save space on their Xiaomi phones.
But up to the present, there is not an option like this on the native interface of Android for Xiami Redmi phones.
Meaning that if  you mount an SD card to your phone , you could ONLY move the data to it (movies, pictures, music), but no the APPS themselves.
Here we depict you step by step how to do that, for phones with Android 6.0 Marshmallow and up , after which, you will get the option to change storage drive for the apps , looking like this :


How to  Move Apps to SD Card on Xiaomi Mobile Phones


Insert the SD card to your phone. 
Now we will convert part of the card, in INTERNAL storage for the phone, that means, a portion of the card will be out of reach for manual storage, since we'll transform it in some kind of internal storage for APPS only.
Take into account, that that part of the SD card will be formatted in such a manner that will be permanent out of reach for storage in the future: that portion will DISAPPEAR from the card forever.

You will need 2 softwares to do this:

1) download to your PC from some place on the web the free AFTISS app :  AFTISS

2) Go to the settings of the phone, to enable the USB Debugging feature on it. Go to Settings > About Phone and tap on the Build Number/MIUI version seven consecutive times, in order to unlock Developer Options. Then, go to  Settings > Developer Options and enable the USB debugging feature.


3) connect your phone to your PC, and run the AFTISS.cmd app on your PC, that was inside the ZIP file. Choose between the options, whether you want to asign 50% or some other percent to APPS storage. The formatting modes are : 

- 25% Internal\75% SDCard
- 50% Internal\50% SDCard
- 75% Internal\25% SDCard
- Custom

4)  open Google Play Store and install the app " PackageViewer+ " :


Then select any app, open its “Storage” settings and tap on the “Change” button adjacent to the Storage feature, if it exists. If not, thats because the developer do not want users to move the app to any SD card:


5) That' all: move your apps to SD card storage. Take into account, that the size of your card will appear reduced like this 16 GB card in this picture, reduced to 4 GB , because 75% of the card has been destined to internal storage :


Also you can see that the phone does not reveals the gained storage size adequately.

It was how to  Move Apps to SD Card on Xiaomi Mobile Phones.
That's All!!! 
Enjoy Angular.....

      by Carmel Schvartzman

כתב: כרמל שוורצמן


Wednesday, August 26, 2020

SOLVED : Angular 9 ERROR Critical dependency: require function is used in a way in which dependencies cannot be statically extracted

In this article we review how to solve the Angular 9 ERROR 'Critical dependency: require function is used in a way in which dependencies cannot be statically extracted',   looking like this :


How to resolve the Angular 9 ERROR 'Critical dependency: require function is used in a way in which dependencies cannot be statically extracted' using Angular9


That;s an owfully bunch of errors all together to be solved, but that could be misleading. In effect, this errors ocurr just while adding an @Output() variable to your child component , like this :


If you pay closest attention, you'll notice that the reference added to the imports is that of protractor, and not the intended one, from @Angular/core :


That's the source of the whole bunch of errors depicted above.
Just change the import settings to that of the correct one, of @Angular/core :


Perform ng s --port 4200 --base-href   /yourwebsitename/  -o again, and get the success message :


That's All!!! 
Enjoy Angular.....

      by Carmel Schvartzman

כתב: כרמל שוורצמן


Wednesday, July 22, 2020

#17 - How to send HTTP DELETE Requests from a SPA to an OData RESTful Web API

In this article we review How to send HTTP DELETE Requests from a SPA to an OData RESTful Web API,  to erase items using a web service, by developing from scratch in 30 minutes an AngularJS SPA (Single Page App) Application that sends HTTP GET, HTTP POST, HTTP PATCH and HTTP DELETE Requests to Add, Edit, and Delete the items from and to a REST OData Web API. Also, all style will be Twitter Bootstrap CSS3.
The source code for this SPA can be found in the following GitHub repository:


Although you can learn this tutorial as a standalone,  also you can see the previous lessons of the series, using the arrows below. This is the Lesson #17 in the "AngularJS: From 0 To 100" articles written for Beginners. This lessons start at Lesson #1   .

<<<<  PREVIOUS LESSON                              NEXT LESSON >>>>


This is a snapshot of the SPA AngularJS that we'll develop from scratch here, in 30 minutes  :

How to send HTTP DELETE Requests from a SPA to an OData RESTful Web API


How to send HTTP DELETE Requests from a SPA to an OData RESTful Web API


As we move forward through this Tutorial, we'll give you the source code to copy-paste to your project. In addition to that,  you can download the entire AngularJS SPA App from the following GitHub repository, all together packed in a ZIP file:


First we add the link references to the javascripts and styles  , using  CDN(content delivery network), instead of downloading the files to our project:
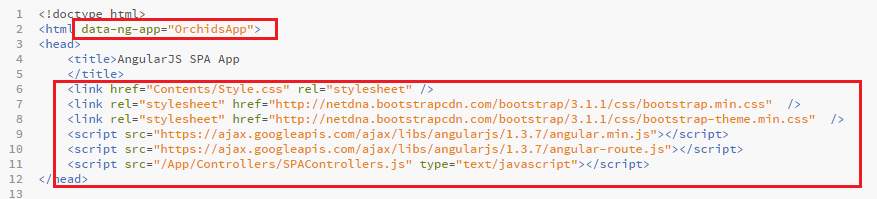
How to send HTTP DELETE Requests from a SPA to an OData RESTful Web API     1

As you see, we add 2 AngularJS scripts, and 2 Bootstrap CSS3 files. Also, we create directories for "Content" and "Controllers". It's important that you have the "angular.js" and ALSO the "angular-route.js" javascript files loaded.
Now, because this is a tutorial about sending HTTP DELETE requests to an OData REST Web API, we'll use the AngularJS SPA  that we built together in 20 minutes through the previous tutorial  Lesson #16  , and that already supports  Create, Read and Update functionality.
We'll add to it the AngularJS "Delete" functionality. That SPA already includes retrieving, adding and editing items by sending HTTP GET, POST and PATCH requests to an OData REST service. So please go back to the Lesson #16 , if you do not have an SPA app already working.

After you have the SPA app with Create, Read and Update functionality working, open the OrchidsList.html file , and add a new Bootstrap icon next to the "Edit" one, as follows:


How to send HTTP DELETE Requests from a SPA to an OData RESTful Web API      2


<a href="#/delete/{{Orchid.BlogID}}">
                             <span class="glyphicon glyphicon-trash" aria-hidden="true"></span>
   </a>

I've remarked the more relevant code in red. The two link buttons do load the "Edit" and the "Delete" View Templates, using the Bootstrap's Glyphicons.
This links send the ID of the selected item to the Edit or the Delete Controllers.

Next, we're going to code the AngularJS Module, and set the Routing to support also the "Delete" option, as follows:
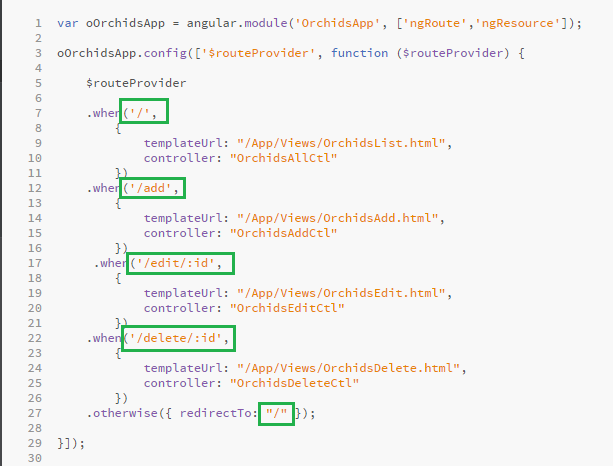
How to send HTTP DELETE Requests from a SPA to an OData RESTful Web API      3


   .when('/delete/:id',
        {
            templateUrl: "/App/Views/OrchidsDelete.html",
            controller: "OrchidsDeleteCtl"
        })

Here we are using the  AngularJS $routeProvider to connect each View with the correspondent Template and  Controller.  If the "/delete" page is required, then the "OrchidsDelete.html" URL template will be displayed, and the "OrchidsDeleteCtl" Controller will be loaded.
This is always the same main HTML web page being browsed here, since this is a SPA application: all belongs to THE SAME URL: there are no web page reloads at all!!!


Finally, we add the "Delete" functionality to our SPA application, by creating a new View template called OrchidsDelete.html, containing this markup:
How to send HTTP DELETE Requests from a SPA to an OData RESTful Web API   4


<div class="container">
<div class="jumbotron">
    <div class="" >    
        <h2>Delete this Orchid</h2>  
    </div> 
        <form name="deleteOrchid" class=""
            data-ng-submit="fnDelete()">
            <input type="text" class="form-control"
            placeholder="Title"
            data-ng-model="Orchid.Title"
            disabled>
            <input type="text" class="form-control"
            placeholder="Text"
            data-ng-model="Orchid.Text"
            disabled>
            <input  data-ng-model="Orchid.MainPicture"  
                class="form-control" 
                disabled/> 
            <input type="submit" class="btn btn-default  btn-lg"
            value="Delete"
            data-ng-disabled="fnDisable()" ><span>&nbsp;{{fnShowMsg()}}</span>
        </form>
    
    <a href="#/">See All Flowers</a>
</div>
    </div>

As you see, all fields are read-only this time.

Also, we add a new Controller, for the "deleting" functionality:

How to send HTTP DELETE Requests from a SPA to an OData RESTful Web API    5


oOrchidsApp.controller('OrchidsDeleteCtl',
    ['OrchidsResource', 'GlobalSvc', '$http', '$routeParams', '$scope', '$location', '$log', 'msg',
        function (OrchidsResource, GlobalSvc, $http, $routeParams, $scope, $location, $log, msg) {

            msg.value = "";
            $scope.isDisabled = false;
            $scope.Orchid = OrchidsResource.get({ id: $routeParams.id });    

            $scope.fnDelete = function () {

                $http(
                {
                    url:  GlobalSvc.getURL() + $routeParams.id,
                    method:"DELETE"

                }
                ).success(function (response) {
                    msg.value = "Orchid successfully deleted";
                    $scope.isDisabled = true;
                }).error(function (err) {  $log.error(err); });
               
            }

            $scope.fnDisable = function () { return $scope.isDisabled;}

            $scope.fnShowMsg = function () { return msg.value; }


}]);


You can see here, that we first use the AngularJS $resource to fetch the data for the selected item, sending an HTTP GET(ID) request to the service. 
Then, when the user clicks the submit button, we send an HTTP DELETE request using the $http service that we inserted into the Controller at the Dependency Injection step.
Also, we add two methods: fnDisable() , to disable the submit button only if the response has been successfully received.
And fnShowMsg() , to display the corresponding message to the user.
Browse to the Main HTML web page, and click over the Bootstrap's "delete" icon:
How to send HTTP DELETE Requests from a SPA to an OData RESTful Web API    6


The Delete View will look as follows:


How to send HTTP DELETE Requests from a SPA to an OData RESTful Web API   7


Click the "Delete" button, and wait for the success message:

How to send HTTP DELETE Requests from a SPA to an OData RESTful Web API   8


If you get no response, or you get errors, check using the Developer's Tools (F12) in the "Network" tab, for the response status. If there is some error , refer to this HTTP Error Tutorial.


Remember to use widely the $log service in your SPA, to send yourself messages for debugging purposes.

That's All!!! You have started sending HTTP DELETE Requests to an OData Web API RESTful service,  from your own SPA application, using the AngularJS Dependency Injection for the $http, $log, and $routeParameters Services. In the next article we will put all the pieces together to  Create a SPA with all CRUD functionality connected to an OData web API restful service using angularjs . 
Enjoy AngularJS.....

      by Carmel Schvartzman


<<<<  PREVIOUS LESSON                        NEXT LESSON >>>>


כתב: כרמל שוורצמן

Wednesday, June 10, 2020

Solved : How to fix the Angular 9 error "node_modules/@angular/common/common"' has no exported member 'ViewportScroller'"

In this article we review how to fix the Angular 9 error "node_modules/@angular/common/common"' has no exported member 'ViewportScroller'"  using Angular 9 with Ionic   , looking like this :


Fix the Angular 9 error "node_modules/@angular/common/common" has no exported member 'ViewportScroller' using Angular9


The error description appears as : "Module ':/ionicapp/node_modules/@angular/common/common"' has no exported member 'ViewportScroller'." .
This error happens after you installed the missing router in the Ionic app :

npm install @angular/router  --save

What the error is trying to inform us is, that the versions installed do not comply : the router installed is a different version from the one of the Angular version on your app.

We have to open the PACKAGE.JSON file, and check the versions there :


In this case, version of the @angular/core is 5.2.11, while the @angular/router that was installed, is version 9.1.9 . Of course it wouldn't work. It lacks/requires all kind of methods and properties.

Therefore, remove the router and install it according to the current version on your application:

npm install @angular/router@5.2.11  --save

After the installation, check again the PACKAGE.JSON, to see if version matches :


Now it looks OK. Compile and keep enjoying !!

That's All!!! 
Enjoy Angular.....

      by Carmel Schvartzman

כתב: כרמל שוורצמן

Wednesday, May 13, 2020

How to change Angular.json settings to generate components without test files

In this article we review How to change Angular.json settings to generate components without test files  using Angular 7,  by changing the settings at the angular.json file of an Angular Application.

Tired of typing " --spec false " every time you create an Angular component using the CLI ? :


How to change Angular.json settings to generate components without test files  using Angular7

In addition, you might even found that  " --spec false "  is deprecated:


So why not changing the settings at the angular.json file ?


Therefore, open the angular.json file and search for the "schematics" section, and add the following lines:

    "schematics": {
        
        "@schematics/angular:component": {
          "skipTests": true
        }


Or:


Next time you use the CLI for creating a component, you will automatically have no testing files:


Also, you can do the same for other kinds of angular,s building blocks, such as guards, directives, pipes, etc :

"@schematics/angular:class": {
          "skipTests": true
        },
        "@schematics/angular:component": {
          "skipTests": true
        },
        "@schematics/angular:directive": {
          "skipTests": true
        },


That's All!!! 
Enjoy Angular.....

      by Carmel Schvartzman

כתב: כרמל שוורצמן

Saturday, April 18, 2020

How to solve the error "No directive with exportAs set to ngForm" while using Angular 7

In this article we review how to solve the error "No directive with exportAs set to ngForm" while using Angular 7.
While declaring a variable on the View, to reference the Template Driven Form that we designed there, we would face an error , at the moment Angular tries to assign the ngForm Directive to the template variable.
The error just states "No directive with exportAs set to ngForm":


How to solve the error "No directive with exportAs set to ngForm" while using Angular7


The cause of the error is quite simple. Indeed, the error message states the problem specifically : "No directive with exportAs set to ngForm".
Remember that ngForm is a Directive . Also, you know that if you code a Directive, you must decorate it with the "export" word.  Therefore, Angular has not found the corresponding Directive, to bind it to the Template.
In other words : "I could'nt find an ngForm directive with an 'export' definition".

So that we do is to open the Module where your Component was declared, let's say the app.module for example, and IMPORT there the FormsModule class, which is in '@angular/forms' :


The FormsModule class, as stated in its definitions, has as its objective to "Exports the required providers and directives for template-driven forms".


After you add this module in the "imports" section, delete and add again the Template variable, and the error will dissapear.

That's All!!! 
Enjoy Angular.....

      by Carmel Schvartzman

כתב: כרמל שוורצמן