Google+
Showing posts with label ASP.Net MVC. Show all posts

Tuesday, April 7, 2020

Solved : Preflight Request CORS error : "The requested resource does not support http method 'OPTIONS'"

In this article we review how to solve the Preflight CORS error "The requested resource does not support http method 'OPTIONS'".
Are you confronted to this error ? :


For several CORS requests, the browser sends a previous request, named "preflight request", before it sends the actual request for the resource.
It is not enought to use the standard CORS (Cross Origin Resource Sharing) on web.config , in order to solve the problem.
Here you can see the web.config settings, usually arranged to solve the problem :


How to solve the Preflight CORS error "The requested resource does not support http method 'OPTIONS'" using Angular7


The issue appears while crossing domains, and relates to POST, PUT, PATCH, and DELETE methods:
here you can see several requests , also from the Angular 7 app, as from POSTMAN :


As said, it is not enought to set the web.config to CORS.
Now,  usually the browser sends a previous request to the request that you are sending, named "preflight request", before it sends the actual request for the resource. This Preflight request is of OPTIONS type.
If the response headers do not allow the required HTTP METHOD, the browser do not send it.

The problem is, the WebApi app has not an action to process the Preflight OPTIONS request :


That is what the error is trying to say us.

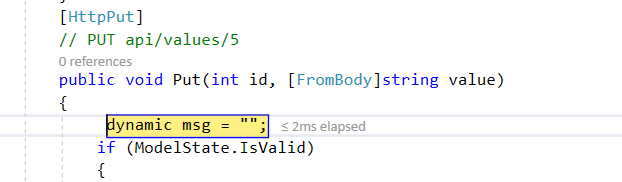
So, just write an action for OPTIONS verb, that only responds an "OK", as this :


Now try again. Send a request. The breakpoint will show the OPTIONS request being processed :


Immediately after, the intended request is taken care of:


That solves this issue.
Have a good day :-)

Enjoy Angular.....

      by Carmel Schvartzman

כתב: כרמל שוורצמן

Sunday, November 23, 2014

How to Build Single Page Applications (SPA) for mobile and tablets using MVC 4

In this article we describe Step by Step How to Build Single Page Applications (SPA) for mobile and tablets using MVC 4.  We'll use Visual Studio 2012 templates and scaffolding in order to create a fully functional SPA web application in just 10 minutes. Later, you could adapt this SPA application to your necessities. The server side will be a Web API using REST , while the client side will be a SPA app . Our SPA web page will look like this:

How to Build Single Page Applications (SPA) for mobile and tablets using MVC 4


From time now, everything has been moving undoubtedly from desktop applications to the Web World Apps. However, nowadays web applications are facing several problems like bad user experience due to web page re-rendering, poor performance because of page reloads and constant re-transmission of data on user interactions, and lack of offline support (meaning that no server connection implies no client alive).

Single-page applications (SPA), or single-page interfaces (SPI), are web applications built on a single one web page, with the intention of provide the user with a desktop application experience, replicating a desktop environment in the web browser. That means that all SPA code is rendered in a single web page load, and can be run on different devices like smartphones, tablets and of course desktops.  SPAs are written in JavaScript , do not require page reloading, and use specialized frameworks like AngularJS, Knockout and more.

Some examples of SPAs are Google Maps, Gmail,  iCloud, GitHub, Google Drive, Hotmail, and Soundcloud . The term "SPA" was first used by Steve Yen in 2005, but the first known experiments on SPA Apps are the 2002 Stuart Morris self-contained website at  slashdotslash   (works only on IE6)  ,  and the US patent by Lucas Birdeau, Kevin Hakman, Michael Peachey and Evan Yeh , describing a single page application implementation. 

SPA apps have therefore several important features like:

1) SPA apps respond like native applications : with minimal response time gained by moving data and processing from the server to the client, and moving business logic to the client : this way, only data validation and permanent storage are located on server side.

2) SPA's bandwidth is minimal : communication with the server Ajax's done , usually in very small JSON  requests. 

3) SPA render like desktop applications :  essentially without server round-trips to retrieve HTML.

4) SPAs are accessible applications : users can use SPAs from smartphones, tablets, laptops etc.

5) SPAs can keep working offline : a SPA can go offline if the server connection falls, and  synchronize the local data with the server afterwards. 

6) No need to download updates : all users need to do is to reload the browser to load the latest version.

7) Navigation between "different" pages is smooth : no page reloading is necessary, since new pages are generated on the fly, without calling the server.

8) SPAs are cross-platform: a SPA works on any operating system . 


Asp.Net  MVC4 comes with the Knockout.js framework, built upon the MVVM two-way data binding software pattern,  which goal is to isolate the UI from the business logic, making the data flow between a ViewModel and Binder in the middle, to synchronize data between the changes made on the View and the Model layer. The ViewModel code replaces the Controller, and makes automatically that synchronization, without knowing neither which View is being exposed, nor where is the data coming from.  

Schematically, MVVM can be put this way:
View: holds the user interface UI with declarative bindings

ViewModel: is a representation of the data, more a Model than a View, holds unsaved data,  and handles the application/presentation logic : as for MSDN, the ViewModel 
"decouples the View from the Model, and consolidates the business logic into the ViewModel and the Model where it can be tested"(MSDN)
The difference between presentation and business logic is, Business logic manages data, while presentation logic manages users behavior. 

Model: data validation & business logic:

How to Build Single Page Applications (SPA) for mobile and tablets using MVC 4 1

How to Build Single Page Applications (SPA) for mobile and tablets using MVC 4 2


Build Single Page Applications (SPA) for mobile and tablets using MVC 4


First, open Visual Studio 2012 and create a new Asp.Net MVC 4 Web Application project :

How to Build Single Page Applications (SPA) for mobile and tablets using MVC 4 3


Next, choose the "Single Page Application" option :

How to Build Single Page Applications (SPA) for mobile and tablets using MVC 4 4


After creation, take a look at the new folders & files added to the project:

How to Build Single Page Applications (SPA) for mobile and tablets using MVC 4 5


As you can see, several important files have been added: a CSS stylesheet , 2 Controllers, some .js script files, and most important, the Knockout.js framework.
As for the data Model, the files added are C# classes representing the entities that we'll be using:

How to Build Single Page Applications (SPA) for mobile and tablets using MVC 4 6


The "ToDo" entity has only two properties , besides the ID index : "Title" and "IsDone" :

How to Build Single Page Applications (SPA) for mobile and tablets using MVC 4 7


It also has a foreign key which represents the Many-To-One relationship between a "Todo" object and the "TodoList" to which the object belongs. That means, every Todo object can belong to one and only one TodoList, and every TodoList can have one or many Todo objects in it.


Wednesday, September 3, 2014

19 Step-By-Step How to Edit records on a Grid in AngularJS

      By Carmel Schvartzman

In this tutorial we'll learn how to Edit records on a Grid in AngularJS in our AngularJS Blogs Application. Each one of the CRUD (Create - Retrieve - Update - Delete) operations have been covered in successive walkthroughs.You can follow this step by step tutorial as a standalone, or you can learn all the posts to build the entire app. This is the STEP 18 in this walkthrough to design an end-to-end AngularJS client MVC app.

In an RESTful API the corresponding CRUD operations are done according to the HTTP request verb: the GET verb is for RETRIEVE, the POST verb is for CREATE, PUT verb  is for UPDATE and the DELETE verb for deleting of course. In previous tutorials we already used the GET, POST and DELETE http verbs, in order to retrieve, create and delete data from the REST API back end. In this walkthrough we'll send requests using the PUT http verb.


We'll create the Edit functionality on an AngularJS table, resulting in the following Grid:


First, we'll upgrade the REST API backend functionality, meaning the ASP.NET MVC controller method which handles the http PUT requests. So go to the NatureController where our API is, and add the following method:


The method just returns a JSON object that represents the blog post being updated.


Now code an "if" to check for invalid or null input, and inside use the Entry() method to change the post state to "modified", that way when you call to SaveChanges(), the Entity Framework will update the entire blog post.


 Now that we have the REST API method for the PUT http verb, go to the method for the GET verb, and modify it to support also individual request for ONLY ONE ID: check if ID has a value:


Inside the if clause, call the DbContext Find() method to get the specific blog post by ID:


Remember that the Blogs entity inherits from DbSet<>, and therefore we can use its very useful methods like Remove(), Add(), Create(),  Find() and so on:


Remember we are using a Database First Entity Model, but we added a DbContext Code Generator :


That template created the POCO (Plain Old Clr Objects) Classes for us:


For example, this is the Blogs class automatically generated by the DbContext:


Now code the return JSON object this way (this code is meant for formatting the Date value):


We have just upgraded our REST API made up using an MVC Controller. Now we need an AngularJS Template for updates: create a new HTML file named "Edit":

Copy-Paste the "details.html" file we created in the previous tutorial, because we need the same form we used for New records, to update them:

Change the title we made for the form, using an "IdToEdit" variable that we'll create soon:


Also, change the button's name and function call:


Next, we'll map that address to an AngularJS Controller and a Template: find the $routeProvider in the Module at Blogs.js.
Add the following mapping, meaning that the html template in file "Edit.html" must be linked to the EditCtl Controller. In the MODEL-VIEW-CONTROLLER architecture of AngularJS, a Template VIEW is related to a MODEL in the configuration step of the AngularJS app live, when we link it to some CONTROLLER.
This linking action is set in a Module, with the function of declaratively set how the AngularJS app should be bootstrapped. It's like the Main method in a program, setting the instantiation of the application.
Because AngularJS is based on the Dependency Injection paradigm, here is the place to configure the app injecting the functionality that we'll need:


Next, let's create that Controller: it will get as parameters the $scope(to get and set the scope variables), a $location (to allow us to redirect the user), the $resource BlogResource, to send requests to the web server, and also a $routeParams, to get the "Id" parameter sent by the AngularJS View:


Our REST API GET method expects an "Id":


If you take a look at the AngularJS Documentation on the API Reference at AngularJS.org site, you'll see that the $resource object supports an get() function to send GET requests to the REST web server:


So call this function to get the details of the selected blog post:


As you recall from previous tutorials, the $resource was created in the Factory of our app, and it worries for the sending of requests to the web server. But as you see in the AngularJS Documentation on the API Reference at AngularJS.org site, there is no function for PUT http requests:


 That's why we need to code an "edit()" method  for PUT requests:


Inside the Controller, we define a new function to send PUT requests to the web server:


That function uses our custom edit() function on the  $resource, sending an "$scope.blog" object to the server, named "Post"(as it was named as a parameter to the Edit( Blog Post) MVC method in the backend).

That function defines a callback in case of success: inside we just redirect the user to the main Blogs List to see the posts, using the $location directive:


Now we'll go to the markup and add a button to the Grid, to Update items. Go to the BlogList.html file and append to the Table headers a button to go to the " #/Edit"  page sending also the Id of the item:  in AngularJS, being a Simple Page Application, there is only one page: in a while we'll map that url to a file called "TemplateUrl" file:


That "Id" parameter will be sent to the AngularJS View and get inside the Controller:


Save and refresh to see the form:


Press the Edit icon to get to the Edit Form:


As you can see at the "Network" tab of the Developers Resources (F12) , the request is http GET and the status is 200 OK:


Now change the Title and try to Update the item:


Nothing happens. Open the Developer resources (F12) and go to the "Network" tab, to see the request sent. We can see the updated blog post was sent coorectly , but the response status is 500 (internal server error):


See the error we received: it fall at the SaveChanges() Entity Framework call:


Set a breakpoint inside the Edit() method to catch the request. Press the button again and see the "post" object:


The status is valid, but if you open the blog post you'll see the ID has not been set (because the Id is the primary key and therefore is not bound):


So just add an "Id" parameter to get the KEY of the item, and set the BlogId field using it:


Of course we must force the AngularJS Model request to include that Id, so add it to the Edit() function:


Save- Refresh to see the Simple Page Application in action. Now press again the Update button on the form.

You'll see that the state is now valid, so the put request will be saved and get status 200 OK:


This time the post has been saved:


That's all!! 
Happy programming.....


כתב: כרמל שוורצמן