Google+
Showing posts with label $log. Show all posts

Thursday, September 10, 2015

#11 - How to create your own Custom AngularJS $service

In this article we review how to create your own Custom AngularJS $service,  by developing an Angular App that includes two Views and two Controllers, and share some Model variables by using a  Custom AngularJS $service  .
This is the Lesson #11 in the "AngularJS: From 0 To 100" learning articles written for AngularJS  Beginners. This lessons start at Lesson #1  , if you wish to take a look at them.
<<<<  PREVIOUS LESSON                      NEXT LESSON >>>>


We're using the  "Brackets"  open source Editor , which supports AngularJS Apps . You can see the 5 minutes tutorial about Brackets in this post.

Our AngularJS App will be shown this way :

How to create your own Custom AngularJS $service


How to create your own Custom AngularJS $service


First of all, let's declare our Angular App by referencing the AngularJS framework and Module:

How to create your own Custom AngularJS $service    1


Then we add the bind to an "external" Controller, which just toggle the two Views using the data-ng-switch-when directive : a View representing the list of Music Albums and a web form setting the selected one, and a View showing the chosen Music Album item after the selection:

How to create your own Custom AngularJS $service    2


(copy-paste):

<body data-ng-controller="SwitcherCtl as TabsCtl">    <div data-ng-switch on="TabsCtl.View">    <div data-ng-switch-when="WebFormView"></div><div id="controls"  data-ng-switch-when="SelectedItemView"></div></div></body></html>


Then add the corresponding Controller at the javascript Controllers file:

How to create your own Custom AngularJS $service   3


This javascript just takes care of toggling the two Views according to the user's clicks.

(copy-paste):

angular.module('MusicApp', [])
.controller('SwitcherCtl', [function() {
     
    this.View = 'WebFormView';
    this.open = function(tab) {
        this.View = tab;
    };
}])


Then we add at the first View the code to show the Album's list, and to input the selected Album's user's choice, as we saw at the Lesson #9 :

How to create your own Custom AngularJS $service     4


(copy-paste):  go to  the Lesson #9 .

Take care to add to the former HTML5 from Lesson #9, the following code to be performed when the "Send" submit button is clicked:

How to create your own Custom AngularJS $service     5

Also, append a second Controller to the javascript file, to be bound to the "WebFormView" :

.controller('MusicController', [ '$scope', function ($scope) {
           
            var albums = 
            [
                {id:111,img:"Nocturnal.jpg",name:"Nocturnal Beats",price:"12.50"},
                {id:112,img:"Facts.jpg",name:"The Facts And The Dreams",price:"11.20"},
                {id:113,img:"Voices.jpg",name:"Voices From The Dust Bowl",price:"13.70"},
                {id:114,img:"Pretz.jpg",name:"Soundcastles",price:"14.80"}
            ]
            $scope.albums = albums;
                                 
             
            $scope.submitForm = function() {


            };
}])


Inside the first View, append a button to go to the second View ("SelectedItemView"):

How to create your own Custom AngularJS $service     6

We just send the View's name to where we want to go, as an argument for the Controller's method open() : 
How to create your own Custom AngularJS $service    7


Next, create the second AngularJS View "SelectedItemView" , bound to a "SelectedItemCtl", as follows:

How to create your own Custom AngularJS $service    8

(copy-paste):

<div id="controls"  data-ng-switch-when="SelectedItemView">
    <div class="centered" data-ng-controller="SelectedItemCtl">
        <div class="centered"> 
            <h1>Fragile State Discography</h1>     
            <h2>Selected Music Album</h2>  
        </div>
         
        <table>
            <tr><td>Client Email   : </td><td><input data-ng-model="order.Email" /> </td></tr>        
            <tr><td>Item's Quantity: </td><td><input data-ng-model="order.Quantity" /> </td></tr>
            <tr><td>Item's ID      : </td><td><input data-ng-model="order.album.id" /> </td></tr>
         </table>
        <button data-ng-click="TabsCtl.open('WebFormView')">See Music Album's List</button>
    </div>
</div>

Notice that we have a button to go back to the selection web form.

Append the third Controller to the javascript file as follows:

How to create your own Custom AngularJS $service     9


Now run the AngularJS App to see if everything works, before going on:

How to create your own Custom AngularJS $service    10


Enter some input data, and click the "Send" button :

How to create your own Custom AngularJS $service    11


The user is redirected to the second AngularJS View, but it's empty:

How to create your own Custom AngularJS $service    12

Why is it empty? Because in AngularJS, the Controllers use different $scope s : they don't share state!
For example, the "order" Model belongs ONLY to the "SelectedItemCtl" Controller, and not to other Controllers:

How to create your own Custom AngularJS $service    13

To solve the problem, and share the "order" variable state between the two Controllers, we will define a custom "SharingService"  $service, and inject it in the two Controllers using Dependency Injection.
So, append an AngularJS Factory to create the custom $service, containing just two methods : get() and set(). These methods will get and set the shared "Order" variable, as follows:

How to create your own Custom AngularJS $service   14

Notice that we also used Dependency Injection to insert the custom AngularJS Service inside the two Controller's constructors. 
In AngularJS, Factories just create the single object which represents a $service to the rest of the AngularJS application, and can be inserted in the constructors of every other Service.
You can read more about AngularJS Factories at the official AngularJS web site.

(copy-paste):

.controller('MusicController', [ '$scope', 'SharingService', function ($scope,SharingService) {
           
            var albums = 
            [
                {id:111,img:"Nocturnal.jpg",name:"Nocturnal Beats",price:"12.50"},
                {id:112,img:"Facts.jpg",name:"The Facts And The Dreams",price:"11.20"},
                {id:113,img:"Voices.jpg",name:"Voices From The Dust Bowl",price:"13.70"},
                {id:114,img:"Pretz.jpg",name:"Soundcastles",price:"14.80"}
            ]
            $scope.albums = albums;
                                 
             
            $scope.submitForm = function() {
                
                SharingService.set($scope.order); 
                
            };
}])
.controller('SelectedItemCtl', ['$scope', 'SharingService','$log', function($scope,SharingService,$log) {
    
    $scope.order = SharingService.get(); 
    $log.info($scope.order);
    
}])
.factory('SharingService', [function() {
    
    var oSelectedItem;
    return {
        get: function() {
            return oSelectedItem;
        },
        set: function(item) {
           oSelectedItem = item;
        }
    };
}]);

Note that we also injected the $log $service in order to output some info to the Console, as we saw at the previous Lesson #10.
Again, enter some data in the web form, and click "Send":

How to create your own Custom AngularJS $service    15


This time, the data has been read at the second Controller:

How to create your own Custom AngularJS $service    16


We added the $log service as follows, to see the "Order" object in the Console:

How to create your own Custom AngularJS $service   17


(copy-paste):

.controller('SelectedItemCtl', ['$scope', 'SharingService','$log', function($scope,SharingService,$log) {
    
    $scope.order = SharingService.get(); 
    $log.info($scope.order);
    
}])


Now if you send again the selected item, you could see the "Order" JSON object :


How to create your own Custom AngularJS $service   18


As you see, "Order" includes several properties like "Email", "Quantity" , and "Album". This later includes an "ID" property with the identity of the Music album selected. The state has been shared when passing from one AngularJS View and Controller , to the other.


That's All!!! You have begun using custom AngularJS Services with Dependency Injection in AngularJS , in order to share state between Controllers . In the next article we will continue to learn Step by Step how to make HTTP GET requests to an OData RESTful web service , using the $http AngularJS service
If you liked the CSS3 style, here you have the code to copy:

 div[id^=controls]{padding:5px 5px 5px 25px;margin:10px 15px 15px 25px;font:900 12px Comic Sans MS;opacity:0.9;background:#fed;    border:10px solid #ddd;    border-radius: 10px;box-shadow:10px 10px 2px #c0c0c0;}button,input[type=submit] {padding:5px 5px 5px 5px;margin:10px 15px 15px 15px;width:220px;text-align: center;background:#ddd; font:900 14px Comic Sans MS;opacity:0.9;border:1px solid #c0c0c0;    border-radius: 10px;box-shadow:10px 10px 2px #c0c0c0;}ul{list-style:none;    }input {padding:5px 5px 5px 5px;margin:10px 15px 15px 15px;width:150px;text-align: center;background:#fea; font:900 12px Comic Sans MS;opacity:0.9;border:7px solid #ddd;    border-radius: 10px;box-shadow:10px 10px 2px #c0c0c0;}select{padding:5px 5px 5px 5px;margin:10px 15px 15px 15px;width:250px;text-align: center;background:#fea; font:900 12px Comic Sans MS;opacity:0.9;border:1px solid #fe9;    border-radius: 10px;box-shadow:10px 10px 2px #c0c0c0;}div.centered{ text-align:center   }.errorMessage{ color:red;   }}


<<<<  PREVIOUS LESSON                     NEXT LESSON >>>>

Enjoy AngularJS.....

      by Carmel Schvartzman


כתב: כרמל שוורצמן


Friday, August 14, 2015

#10 - What are AngularJS Services and Dependency Injection

In this article we review What are AngularJS Services and Dependency Injection,  by developing an Angular App and using a  built-in AngularJS $service  .
This is the Lesson #10 in the "AngularJS: From 0 To 100" learning articles written for AngularJS  Beginners. This lessons start at Lesson #1  , if you wish to take a look at them.
<<<<  PREVIOUS LESSON                             NEXT LESSON >>>>


We're using the  "Brackets"  open source Editor , which supports AngularJS Apps . You can see the 5 minutes tutorial about Brackets in this post.

Our AngularJS App will be this way :  
What are AngularJS Services and Dependency Injection


What are AngularJS Services and Dependency Injection


$services are singleton (created only once on all the lifespan of the app) objects lazy instantiated (created just the first time the object is needed, not before that) through an entire AngularJS App lifespan (services share variables state, cache and behavior). Using $services we can share state and behavior all over our app. They can be built-in (like $http, $log, $location, $window, etc) , or custom services written by you.
Because of the importance of mastering the AngularJS logging, we'll practice here using the $log AngularJS service. We'll learn about the $http Service while learning to persist data in the web server.
More details about $services can be learned from the official AngularJS web site.
$services implement the Dependency Injection Paradigm,

For example, the traditional way to use a component inside another object is as follows:

function fnUsingAService()
{
     var $someService = new SomeService(new SomeOtherService(new YetAnotherService()));
     $someService.DoSomething();
}

Here we're instantiating a component, which must get some other component instantiated inside. And what if the "SomeOtherService()" also needs some inner services instantiated("YetAnotherService()") ? The component's  chain could be rather complicated.
However, using dependency injection, we don't instantiate neither the injected service, nor the component's chain of services inside it. Instead, we receive it already instantiated and working:

function fnUsingAService($someService)
{     
     $someService.DoSomething();
}

The AngularJS engine takes care of creating the service for us.
Let's see how it works: let's create our own AngularJS and use the $log built in AngularJS Service. First add to the HTML5 the data-ng-app Angular directive, and load the AngularJS Framework via CDN (Content Delivery Network):

What are AngularJS Services and Dependency Injection    1

(copy-paste):

<!doctype html>
<html lang="en"  data-ng-app="usingServices">
<head>  
<meta charset="UTF-8">
  <title>Using Services</title>

  <script src="//ajax.googleapis.com/ajax/libs/angularjs/1.3.7/angular.min.js"></script>
  <script src="Controller.js"></script>
  <link href="style.css" rel="stylesheet"/>
  
</head>


Then add a div bound to a Controller, containing an input text and a button as follows:


What are AngularJS Services and Dependency Injection    2


At the Controller javascript file, create a Controller and use dependency injection inserting two services in it : $scope and $log , as follows:

What are AngularJS Services and Dependency Injection    3


As you see, we are using those two services for the Controller's method: $scope will store the method itself, while $log will be used to output the received message, by calling the $log.info() method.
Browse to the AngularJS app , enter a message and click the button:

What are AngularJS Services and Dependency Injection    4


Then, open the Developer's Tools (F12) to see the "info" message in the Console:

What are AngularJS Services and Dependency Injection   5


Next, append to the AngularJS View another three buttons for sending "warning", "log" and "error" messages through the $log service:


What are AngularJS Services and Dependency Injection 6


(copy-paste):

<body>
  <div data-ng-controller="LogCtl">
  <h2>Type the message to be displayed on the Console:</h2>

  Message:
  <input data-ng-model="msg"/>

  <button data-ng-click='fnShowInfoMessage(msg)'>Info</button>

  <button data-ng-click='fnShowWarningMessage(msg)'>Warning</button>

  <button data-ng-click='fnShowLogMessage(msg)'>Log</button>

  <button data-ng-click='fnShowErrorMessage(msg)'>Error</button>

</div>
</body>
</html>


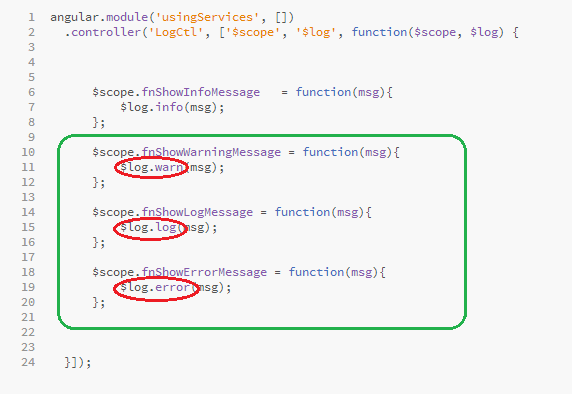
At the Controller, add the corresponding methods and call the $log warn() , log() and error() functions:

What are AngularJS Services and Dependency Injection    7

(copy-paste):

angular.module('usingServices', [])  
.controller('LogCtl', ['$scope', '$log', function($scope, $log) {   

      $scope.fnShowInfoMessage   = function(msg){   
       
          $log.info(msg);          
      };   
   
      $scope.fnShowWarningMessage = function(msg){  
        
          $log.warn(msg);          
      };    
  
      $scope.fnShowLogMessage = function(msg){
          
          $log.log(msg);          
      };  
    
      $scope.fnShowErrorMessage = function(msg){  
        
          $log.error(msg);          
      };  

  }]);


Refresh the web page and click the "Warning" button:

What are AngularJS Services and Dependency Injection   8


The Console reflects the warning message. Now do the same for the "Log" button:


What are AngularJS Services and Dependency Injection  9


And finally send an error message:

What are AngularJS Services and Dependency Injection    10


That's All!!! You have begun learning AngularJS Services and Dependency Injection in AngularJS , and using the $log service to send warnings, log, info and error messages to and from the app . In the next article we will continue to learn Step by Step about how to share data between different AngularJS Controllers by using Custom AngularJS $services
If you liked the CSS3 style, here you have the code to copy:

 div,input
{
padding:5px 5px 5px 25px;
margin:10px 15px 15px 25px;
font:900 12px Comic Sans MS;
opacity:0.9;
background:#fed;    
border:10px solid #ddd;    
border-radius: 10px;
box-shadow:10px 10px 2px #c0c0c0;
text-align:center;
}
input
{
padding:5px 5px 5px 25px;
margin:10px 15px 15px 25px;
font:900 12px Comic Sans MS;
opacity:0.9;
background:#FFF;    
border:10px solid #ddd;    
border-radius: 10px;
box-shadow:10px 10px 2px #c0c0c0;
text-align:center;
}
button 
{
padding:5px 5px 5px 5px;
margin:10px 15px 15px 15px;
width:220px;
text-align: center;
background:#ddd; 
font:900 14px Comic Sans MS;
opacity:0.9;
border:1px solid #c0c0c0;    
border-radius: 10px;
box-shadow:10px 10px 2px #c0c0c0;
}
ul
{
list-style:none;    
}

<<<<  PREVIOUS LESSON                               NEXT LESSON >>>>

Enjoy AngularJS.....

      by Carmel Schvartzman


כתב: כרמל שוורצמן