Google+
Showing posts with label Pre-Requisites. Show all posts

Monday, August 26, 2013

5 Step-By-Step How-to add the Twitter Bootstrap framework

            By Carmel Schvartzman


In this tutorial we'll add the Twitter Bootstrap framework to the .NET MVC 4 application which serves as a backend to our Blogs Application. 
 You can follow this step by step tutorial as a standalone, or you can learn all the posts to build the entire app. This is the STEP 5 in this walkthrough to design an end-to-end AngularJS client MVC app. The bootstrap is open source since August, 2011, and was the most popular GitHub development project in 2012.


The Twitter Bootstrap was developed as a framework to encourage internal application consistency, instead of using several libraries for UI development, which led to inconsistencies and a high maintenance burden. It's customizable and equipped with JS libraries which allow us to manipulate and use modal windows alerts, buttons, tooltips, scrollspy and so on.


1. Go to TOOLS and open the Package Manager Console:


2. Type "Install-Package Twitter.Bootstrap".

3. If there's a newer JQuery version, it will be detected and fixed in the setup:

4. Next, the Twitter.Bootstrap will be installed:


5. After the installation, open the SCRIPTS folder and confirm the Bootstrap JS files have been added:

6. Take a look to the CONTENT folder to check the Boostrap is there. The "min" files are the ones to be used in production:

That's all!! Happy programming.....

4 Step-By-Step How-to add a DBContext code generator

            By Carmel Schvartzman

 In this tutorial we'll add an DBContext API to the .NET MVC 4 application which serves as a backend to our Blogs Application. You can follow this step by step tutorial as a standalone, or you can learn all the posts to build the entire app. This is the STEP 4 in this walkthrough to design an end-to-end AngularJS client MVC app.

The advantage of generating POCO (Plain Old CLR Objects) classes via T4 templates such as the ADO.Net DBContext code Generator is that they offer extensibility over the entity object definitions, far over standard EDMX data access. Also the DbContext can be used with Database First, Model First and Code First programming development.
There is not performance impact, and the DbContext API is simplified and user friendly, both in terms of features and usage. However, we can still getthe ObjectContext functionality from the DbContext and use features available only in the former. Most important, in this tutorial we'll be using the Data First approach, so we'll want to implement the DBContext.

1. Open the .EDMX file we created in STEP 3, open the MODEL BROWSER , Mouse over the Conceptual Entity Model and right click, selecting "Add Code Generation Item":

2. In the dialog, type "DBCONTEXT" on the SEARCH text box. After a little while, select the EF 5.x DbContext Generator, and type "NatureModel.tt" as the template name:

Press the "ADD" button.
3. Note the files added to the Models folder:

4. Take a close look at the Blog.cs file:

This is the POCO class that the code generation tool created for us.

5. In the POCO BLOG class, take a look at the public properties. You'll see that a "Comments" collection has been added, representing the one-to-many Blog-Comments relationship:
The "virtual" keyword controls lazy loading, that means if you use the "virtual" keyword on an ICollection one-to-many relationship property, it will be lazy-loaded by default, instead if you don't, it will be eager-loaded. The EntityFramework will create at runtime a new class derived from the "Blog" class and use it instead. This dynamically created Blog classwill contain logic to load the navigation property data when accessed for the first time, provided that all the class' navigation properties are virtual, the context.Configuration.ProxyCreationEnabled must not be disabled, the context.Configuration.LazyLoadingEnabled must not be disabled,  and also the entity must be attached  to the context.

Lazy loading means the process whereby a collection of entities is automatically loaded from the database just the first time that the property referring to the entities is accessed.  For example, when using the Blog  class , the related Comments wont be loaded until the first time the Comments navigation property is accessed. Lazy loading of the Comments collection can be turned off by making the Comments property non-virtual. Also, lazy loading can be turned off for all the entities in the context.

6. The same considerations apply on the "Comment" entity:

That's all!! Happy programming.....
כתב: כרמל שוורצמן

3 Step-By-Step How-to add an Entity Data Model

            By Carmel Schvartzman

 In this tutorial we'll add an Entity Data Model to the .NET MVC 4 application which serves as a backend to our Blogs Application. You can follow this step by step tutorial as a standalone, or you can learn all the posts to build the entire app. This is the STEP 3 in this walkthrough to design an end-to-end AngularJS client MVC app.


  1. Mouse over the "Models" folder and right-click >> Add >> New Item:


2. Select "Data" and ADO.NET Entity Data Model:
Name the E.D.M. as "NatureModel".

3. Our Data Model will contain data from  the database:

4. Choose the data connection appropriate to your SQL SERVER, and name the saved connection in the Web.Config file as "NatureEntities":

5. We'll want to include in our model the tables we created previously on STEP 1 of this walkthrough:

6. After you pressed "Finish", you can open the EDMX (Entity Data Model x) file to see the Entity Model:
That's all!! Happy programming.....

כתב: כרמל שוורצמן

2 Step-By-Step How-to Setup the AngularJS framework

             By Carmel Schvartzman

In this tutorial we'll install the AngularJS framework in an .NET MVC 4 application to serve as a backend to our Blogs Application. You can follow this step by step tutorial as a standalone, or you can learn all the posts to build the entire app. This is the STEP 2 in this walkthrough to design an end-to-end AngularJS client MVC app.


  1. Create an MVC 4 application:


2. Select the "Internet Application" template:


3. Next, we'll add the AngularJS framework to our app: go to TOOLS and then to PACKAGE MANAGER CONSOLE:

4. Once the console opens, type "Install-Package AngularJS": this command will download and install the AngularJS framework files in the appropriate folders:

5. After the installation, note that the following files have been copied to our proyect:
That's all!! Happy programming.....

כתב: כרמל שוורצמן

Thursday, August 22, 2013

1 Step-By-Step How-to design SQL server tables

                                                                                                   By Carmel Schvartzman

In this tutorial we'll create 3 tables in SQLSERVER 2008 , to store our Blogs Application. You can follow this step by step tutorial as a standalone, or you can learn all the posts to build the entire app. This is the STEP 1 in this walkthrough to design an end-to-end AngularJS client MVC app. 
First, let's create a "Blog" table, containing the following columns:


The column BlogID will be the PRIMARY KEY, so let's declare it that way, also setting its "IDENTITY SPECIFICATION" to "yes":


This will increment the BlogID in 1 each time we add a new record to the table.

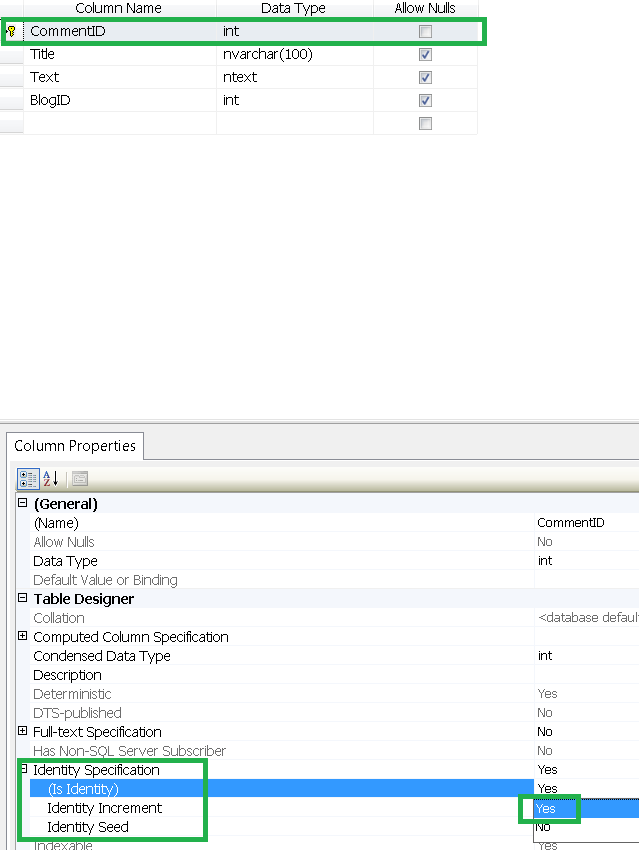
Next, add a new table called "Comment", with the following columns:


Select the CommentID column, and right-click the mouse:

Click "SET PRIMARY KEY". Now the primary key icon appears on the CommentID column:


Next, select the CommentID column and double-click "IS IDENTITY", to set the automatic identity increment:


Now press CTL-S on the keyboard to save the table:


The table will be saved with the "Comment" name.
The third table is the one which holds the names of the bloggers.
Add the following columns , and set BloggerID as the PRIMARY KEY:
Next, set the IDENTITY INCREMENT for this column:


Finally, we'll establish the relationships between the three tables, creating FOREIGN KEYS.
Open the Comment table in the Object Explorer (press F8), and click "New foreign key":
When this dialog opens, press the button aside "Tables and Columns Specification":
The following dialog will open:

Don't worry about the "Relationship name": the SQL management studio will automatically set it ("FK_" means FOREIGN KEY).
You can see that our "Comment" table has a "BlogID" column: that is the name of the PRIMARY KEY of the "Blog" table. Therefore, set  "primary key table" = "Blog" ,  and map both "BlogID" columns.

Do exactly the same between the "Blog" table and the "Blogger" table , mapping the "BloggerID" columns.

Finally, we'll build a DATABASE DIAGRAM showing the relationships between our 3 tables.
Open the Object Explorer (F8):
Once there, pick from the tables list the 3 tables you just built, and close the dialog. You will have the Blogs database diagram we designed:

There you can see the ONE-TO-MANY relationships between our tables.
That's all…
Happy programming!!!

כתב: כרמל שוורצמן

Monday, August 19, 2013

Pre-requisites: ASP.NET Web API Installation


  1. In this walkthrough we'll install the ASP.NET Web API HTTP service in order to design an Rest backend.  You can follow this step by step tutorial as a standalone, or you can learn all the posts to build the entire app.
    The ASP.NET Web API is a framework that makes easy to build HTTP web services that can be used by a broad range of clients, meaning both browsers and mobile. Using the Rest technologies, we could then return data according to client requests, both JSON and XML, and according to the VERB of the request: the browser can make a GET, PUT, POST, or DELETE request and get the corresponding server response appropriately.
    The Web API is included in ASP.NET MVC 4, a framework designed for building scalable web applications while using stable design patterns, and fit to both Visual Studio 2010 and Visual Studio 2012 .
    You can download the Web API in this link :
  2. Or using NuGet :   PM>  Install-Package AspNetWebApi
  3. Then follow the setup friendly steps:


And that's all.

כתב: כרמל שוורצמן