The source code for this SPA can be found in the following GitHub repository:
https://github.com/CarmelSoftware/AngularJS_OData_HTTPPATCH/tree/master
This step-by-step tutorial can be learned as a standalone, but also you can see the previous lessons of the series, using the arrows below. This is the Lesson #16 in the "AngularJS: From 0 To 100" articles written for Beginners. This lessons start at Lesson #1 .
<<<< PREVIOUS LESSON NEXT LESSON >>>>
(If you need to follow a short Tutorial about using the "Brackets" open source web Editor , optimized for AngularJS development, you can browse to this post.)
This is a snapshot of the AngularJS App that we'll develop from scratch here, in 20 minutes :

How to send PATCH Requests to an OData Web API RESTful service using $http AngularJS
While we move forward through this Tutorial, you'll be given the source code to copy-paste to your project. But always you could download the entire AngularJS SPA App from the following GitHub repository, packed in a ZIP file:
https://github.com/CarmelSoftware/AngularJS_OData_HTTPPATCH/archive/master.zip
First, let's add the references to the scripts and styles to use, via CDN(content delivery network), instead of downloading all files to our app. Also, we are defining the HTML5 file as an data-ng-app Angular App:
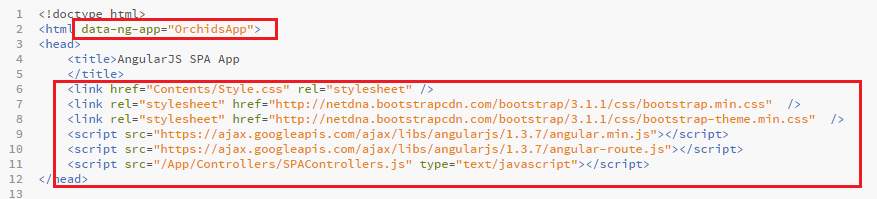
As you see, we add 2 AngularJS scripts, and 2 Bootstrap CSS3 files. Also, we create directories for "Content" and "Controllers".
<!doctype html>
<html data-ng-app="OrchidsApp">
<head>
<title>AngularJS SPA App
</title>
<link href="Contents/Style.css" rel="stylesheet" />
<link rel="stylesheet" href="http://netdna.bootstrapcdn.com/bootstrap/3.1.1/css/bootstrap.min.css" />
<link rel="stylesheet" href="http://netdna.bootstrapcdn.com/bootstrap/3.1.1/css/bootstrap-theme.min.css" />
<script src="https://ajax.googleapis.com/ajax/libs/angularjs/1.3.7/angular.min.js"></script>
<script src="https://ajax.googleapis.com/ajax/libs/angularjs/1.3.7/angular-route.js"></script>
<script src="/App/Controllers/SPAControllers.js" type="text/javascript"></script>
</head>
Next, copy-paste the following CSS3 style to your style.css (placed at the "Contents" folder) file:
body {background:rgba(255, 238, 238, 0.5);
}
img {width:99%;height:99%;
}
.select
{
width:100px;
padding:5px 5px 5px 25px;
margin:10px 15px 15px 25px;
font:900 12px Comic Sans MS;
opacity:0.9;
background:#f0f0f0;
border:5px solid #ddd;
border-radius: 10px;
box-shadow:10px 10px 2px #c0c0c0;
}
.centered
{
text-align:center;
}
.div-table{
display:table;
width:auto;
background-color:#eee;
border-spacing:5px;
}
.div-table-row{
display:table-row;
width:auto;
clear:both;
}
.div-cell-left{
float:left;
display:table-cell;
width:33%;
height:200px;
padding:5px 5px 5px 5px;
}
.div-cell-center{
float:left;
display:table-cell;
width:56%;
height:200px;
padding:5px 5px 5px 5px;
}
.div-cell-right{
float:left;
display:table-cell;
width:10%;
height:200px;
padding:5px 5px 5px 5px;
}
.msg {
font:900 Comic Sans MS;
color:#1b42ae;
}
Next, add a NavBar.html file (again at the Contents folder) containing the Bootstrap NavsBar as follows (adding the Twitter Bootstrap is thoroughly explained in this Bootstrap Tutorial):
<nav class="navbar navbar-default">
<div class="container-fluid">
<div class="navbar-header">
<a class="navbar-brand" href="/">Orchids</a>
</div>
<div class="collapse navbar-collapse" id="bs-example-navbar-collapse-1">
<ul class="nav navbar-nav">
<li class="active"><a href="/">Home <span class="sr-only">(current)</span></a></li>
<li><a href="#/">Orchids SPA</a></li>
<li><a href="/PDF">Create PDF</a></li>
<li><a href="/Home">Help</a></li>
<li><a href="/Home/About">About</a></li>
</ul>
<form class="navbar-form navbar-left" role="search">
<div class="form-group">
<input type="text" class="form-control" placeholder="Search">
</div>
<button type="submit" class="btn btn-default">Submit</button>
</form>
<ul class="nav navbar-nav navbar-right">
<li><a href="/Home">Technologies</a></li>
</ul>
</div>
<!-- /.navbar-collapse -->
</div>
<!-- /.container-fluid -->
</nav>
<nav class="navbar navbar-default">
<div class="container-fluid">
<div class="navbar-header">
<a class="navbar-brand" href="/">Orchids</a>
</div>
<div class="collapse navbar-collapse" id="bs-example-navbar-collapse-1">
<ul class="nav navbar-nav">
<li class="active"><a href="/">Home <span class="sr-only">(current)</span></a></li>
<li><a href="#/">Orchids SPA</a></li>
<li><a href="/PDF">Create PDF</a></li>
<li><a href="/Home">Help</a></li>
<li><a href="/Home/About">About</a></li>
</ul>
<form class="navbar-form navbar-left" role="search">
<div class="form-group">
<input type="text" class="form-control" placeholder="Search">
</div>
<button type="submit" class="btn btn-default">Submit</button>
</form>
<ul class="nav navbar-nav navbar-right">
<li><a href="/Home">Technologies</a></li>
</ul>
</div>
<!-- /.navbar-collapse -->
</div>
<!-- /.container-fluid -->
</nav>
In the main HTML file, add a <div> bound to an data-ng-view, and a data-ng-include to insert the NavBar HTML5 inside the web page:

<body class="container">
<div data-ng-include="" src="'Contents/Navbar.html'" ></div>
<div class="jumbotron">
<h1>Orchids SPA - AngularJS App</h1>
</div>
<div id="container">
<div data-ng-view=""></div>
</div>
</body>
</html>
This <div> element will be replaced by AngularJS with three Template Views, according to the User's selection ("#/" , "#/add" and "#/edit"), that we're going to design next: a List of Items, a template for Adding a new Item, and another one for Editing .
The first one is for the List of flowers, so create an "/App/Views/OrchidsList.html" file, and paste the following code inside it:
<div class="jumbotron" >
<h2>List of my Favorite Orchids</h2>
<h4 class="msg">{{Message}}</h4>
</div>
<div class="jumbotron">
<ul class="list-group">
<li data-ng-repeat="Orchid in OrchidsList" class="list-group-item">
<div class="div-table" >
<div class="div-table-row">
<div class="div-cell-left">
<img src="http://carmelwebapi.somee.com/AngularJS/Contents/Images/{{Orchid.MainPicture}}" alt="{{Orchid.Title}}" title="{{Orchid.Title}}" >
</div>
<div class="div-cell-center">
<span >{{Orchid.BlogID}} . {{Orchid.Title | uppercase}} <br /><br />
{{Orchid.Text}} {{Orchid.DatePosted | date }}
</span>
</div>
<div class="div-cell-right">
<a href="#/edit/{{Orchid.BlogID}}">
<span class="glyphicon glyphicon-pencil" aria-hidden="true"></span>
</a>
</div>
</div>
</div>
</li>
</ul>
<div class="panel panel-default">
<div class="panel-body | centered">
<button data-ng-click="fnShowOrchids(-1)" class="btn btn-default btn-lg" ><span class="glyphicon glyphicon-hand-left" aria-hidden="true"></span></button>
<input type="number" data-ng-model="pageSize" max="4" min="1" value="2" class="select"/>
<button data-ng-click="fnShowOrchids(1)" class="btn btn-default btn-lg" ><span class="glyphicon glyphicon-hand-right" aria-hidden="true"></span></button>
</div>
</div>
<a href="#/add">Add your Favorite Flowers</a>
</div>

I've remarked the more relevant code in red. The two buttons are for Pagination of the items forward and backwards. The Input "number" is for setting the size of every page while paging. Also, we just display all the flowers by showing all the OrchidsList that we will prepare at the Controller.
We explained using AngularJS collections and the data-ng-repeat in a previous lesson .
There is also a link button to load the "Edit" View Template, using one of the Bootstrap's Glyphicons.
This link sends the ID of the selected item to the Edit Controller.
Next, we're going to code the AngularJS Module, the Routing , and the Controllers.
Create a javascript SPAControllers.js file, and add a Module with a RouteProvider, as follows:

var oOrchidsApp = angular.module('OrchidsApp', ['ngRoute','ngResource']);
oOrchidsApp.config(['$routeProvider', function ($routeProvider) {
$routeProvider
.when('/',
{
templateUrl: "App/Views/OrchidsList.html",
controller: "OrchidsAllCtl"
})
.when('/add',
{
templateUrl: "App/Views/OrchidsAdd.html",
controller: "OrchidsAddCtl"
})
.when('/edit/:id',
{
templateUrl: "App/Views/OrchidsEdit.html",
controller: "OrchidsEditCtl"
})
.otherwise({ redirectTo: "/" });
}]);
We are using an AngularJS $routeProvider to bind each View with the correspondent Template and Controller. When the default "/" is required, the user will be faced with the "All" template. If the "/add" page is required, then the "Add" template will be displayed.
The same thing for the "Edit" template.
Remember, this is always the same HTML web page that is browsed here. This is a SPA application: all is done in THE SAME url: there are no reloads of the HTML page!!!
That's why we referenced the angular-route.js javascript at the <head>: to use the $routeProvider at the Module, and enabling an SPA application.
Next we add some Global variables, that is, some data that will be reused by the different Controllers, and we do not want to repeat several times all over the App:

oOrchidsApp.value('msg', { value: '' });
oOrchidsApp.factory('GlobalSvc', [function () {
var oFlowersPictures = ["haeckel_orchidae.jpg", "Bulbophyllum.jpg", "Cattleya.jpg", "Orchid Calypso.jpg", "Paphiopedilum_concolor.jpg", "Peristeria.jpg", "Phalaenopsis_amboinensis.jpg", "Sobralia.jpg"];
var sURLDev = 'http://localhost:21435/WebAPI/OrchidsWebAPI/';
var sURLProd = 'http://CARMELWEBAPI.SOMEE.COM/WebAPI/OrchidsWebAPI/';
var bIsDevelopmentTest = false;
var sURL = bIsDevelopmentTest ? sURLDev : sURLProd;
return {
getFlowers: function () { return oFlowersPictures; },
getURL: function () { return sURL; }
};
}]);
The "value" object will contain a global message which communicates between the different Templates.
The "GlobalSvc" is a Service created by an AngularJS Factory, containing the URLs used all over the Application, and also the list of items to be displayed by the Select list that we'll put in every View Template.
We code two URLs: one for testing purposes and debugging, and one for Deployment.
Next, we create a Resource, that will help us to sending HTTP GET requests for a specific ID of an item:

oOrchidsApp.factory('OrchidsResource', ['GlobalSvc', '$resource',function (GlobalSvc, $resource) {
return $resource(GlobalSvc.getURL() + ":id", { id: "@id" });
}]);
Now we need the code for loading the View ALL Items Template, therefore add to the Module the following Controller:
oOrchidsApp.controller('OrchidsAllCtl', ['GlobalSvc', '$scope', '$http', '$log', 'msg', function (GlobalSvc, $scope, $http, $log, msg) {
$scope.angularClass = "angular";
$scope.OrchidsList = [];
$scope.pageSize = 2;
var iCurrentPage = -1;
$scope.fnShowOrchids = function (direction) {
iCurrentPage = iCurrentPage + direction;
iCurrentPage = iCurrentPage >= 0 ? iCurrentPage : 0;
var sURL = GlobalSvc.getURL() +
"?$skip=" +
iCurrentPage * $scope.pageSize
+ "&$top=" +
$scope.pageSize;
$http.get(sURL).success(function (response) {
$scope.OrchidsList = response;
$log.info("OK");
},function (err) { $log.error(err) })
$scope.Message = "";
}
$scope.fnShowOrchids(1);
$scope.Message = msg.value;
}
]);

This HTTP GET Ajax request code is thoroughly explained in the Lesson #14. Here we just get the URL from the "GlobalSvc" Service, append to it the OData code for Paging ("$skip=" + "$top="), and send an HTTP GET REST request via the $http Service.
The "direction" function argument, as explained in a previous tutorial, is for paging backwards and forward.
Notice that we made Dependency Injections for three services : $scope, to get the variables, $http for sending HTTP REST requests to the web server, and $log for logging and making easy to debug our app.
In case you don't have an OData RESTful web service working on your environment, i developed and deployed one that you can use. It can be found at this URL:
http://carmelwebapi.somee.com/WebAPI/OrchidsWebAPI
You can use freely use it: an example of using this OData Web API:
http://carmelwebapi.somee.com/WebAPI/OrchidsWebAPI/?$skip=2&$top=3
If you already have an OData service working, just replace the URLs at the Service.
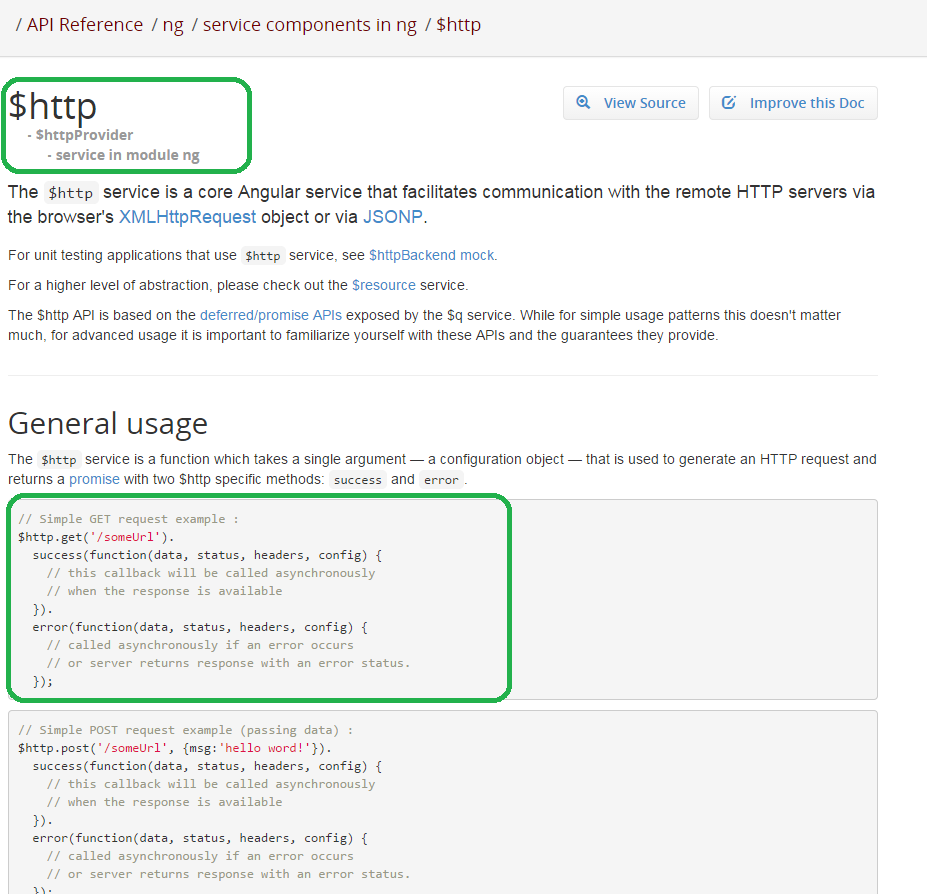
We're going to fetch the data from an OData RESTful service, by using the Ajax Service called $http in Angular. This service provide all kinds of HTTP functionality, like sending HTTP POST, PATCH, HTTP PUT or DELETE requests. Next we will use both the HTTP GET, and the HTTP POST and PATCH verbs.
The documentation for the $http service can be seen at the Angular official web site:
Now let's design the AngularJS Template View for adding a new item to the Orchids collection.
The "Add" Template will show as follows:
<div class="container">
<div class="jumbotron">
<div class="" >
<h2>Add your Favorite Orchid</h2>
</div>
<form name="addOrchid" class=""
data-ng-submit="fnAdd()">
<input type="text" class="form-control"
placeholder="Title"
data-ng-model="Orchid.Title"
required>
<input type="text" class="form-control"
placeholder="Text"
data-ng-model="Orchid.Text"
required>
<select data-ng-model="Orchid.MainPicture" title="Select a Picture" data-ng-options="Img for Img in Flowers" class="form-control"></select>
<input type="submit" class="btn btn-default btn-lg"
value="Add"
data-ng-disabled="addOrchid.$invalid">
<span>{{fnShowMsg()}}</span>
</form>
<a href="#/">See All Flowers</a>
</div>
</div>

At the Module, add a new Controller to add a ITEM capabilities of our SPA:

oOrchidsApp.controller('OrchidsAddCtl',
['GlobalSvc', '$http', '$scope', '$location', '$log', 'msg',
function (GlobalSvc, $http, $scope, $location, $log, msg) {
msg.value = "";
$scope.Flowers = GlobalSvc.getFlowers();
$scope.fnAdd = function () {
var oFlower = { "Title": $scope.Orchid.Title, "Text": $scope.Orchid.Text,
"MainPicture": $scope.Orchid.MainPicture };
$http({
url: GlobalSvc.getURL(),
method: "POST",
data: oFlower,
headers: { 'Content-Type': 'application/json' }
}).success(function (data, status, headers, config) {
msg.value = "New Orchid saved";
$scope.IsSaved = true;
}).error(function (err) {
$log.error(err);
});
}
$scope.fnShowMsg = function () { return msg.value; }
}
]);
Finally, we'll create the "Edit" View Template for our SPA. Add a new HTML file called "" and type the following markup:

<div class="container">
<div class="jumbotron">
<div class="" >
<h2>Edit your Favorite Orchid</h2>
</div>
<form name="editOrchid" class=""
data-ng-submit="fnEdit()">
<input type="text" class="form-control"
placeholder="Title"
data-ng-model="Orchid.Title"
required>
<input type="text" class="form-control"
placeholder="Text"
data-ng-model="Orchid.Text"
required>
<select data-ng-model="Orchid.MainPicture" title="Select a Picture" data-ng-options="Img for Img in Flowers" class="form-control"></select>
<input type="submit" class="btn btn-default btn-lg"
value="Update"
data-ng-disabled="editOrchid.$invalid">
<span>{{fnShowMsg()}}</span>
</form>
<a href="#/">See All Flowers</a>
</div>
</div>
Then go back to the javascript Module and append another Controller as follows:

oOrchidsApp.controller('OrchidsEditCtl',
['OrchidsResource', 'GlobalSvc', '$http', '$routeParams', '$scope', '$location', '$log', 'msg',
function (OrchidsResource, GlobalSvc, $http, $routeParams, $scope, $location, $log, msg) {
msg.value = "";
$scope.Flowers = GlobalSvc.getFlowers();
$scope.Orchid = OrchidsResource.get({ id: $routeParams.id });
$scope.fnEdit = function () {
var oFlower = { "BlogId": $routeParams.id , "Title": $scope.Orchid.Title,
"Text": $scope.Orchid.Text, "MainPicture": $scope.Orchid.MainPicture };
$http({
url: GlobalSvc.getURL() + $routeParams.id,
method: "PATCH",
data: oFlower,
headers: { 'Content-Type': 'application/json' }
}).success(function (data) { msg.value = "Orchid successfully updated"; }).error(function (err) { });
}
$scope.fnShowMsg = function () { return msg.value; }
}
]);
The get() method of the OrchidsResource just send an HTTP GET request to get THIS specific item that we're going to edit.
Then we use $http to send an HTTP PATCH request, and if the response is OK ("success"), we change the "msg" value to output some feedback to the user. Also, this "msg" variable is Global, and that will allows us to show a message also at the List View Template, although it has an other different $scope at all.
Save and run the SPA:
Now you can click the "Add" link to be prompted with the "Add" template, which will look this way:
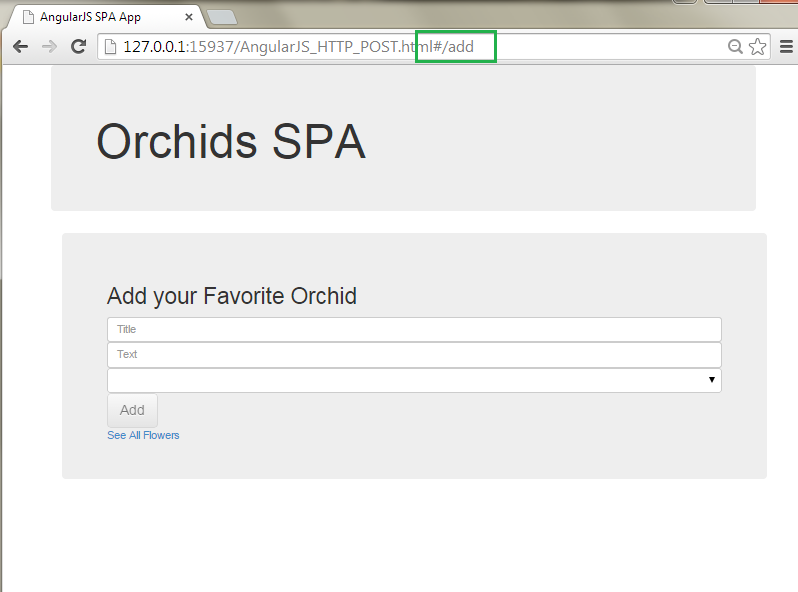
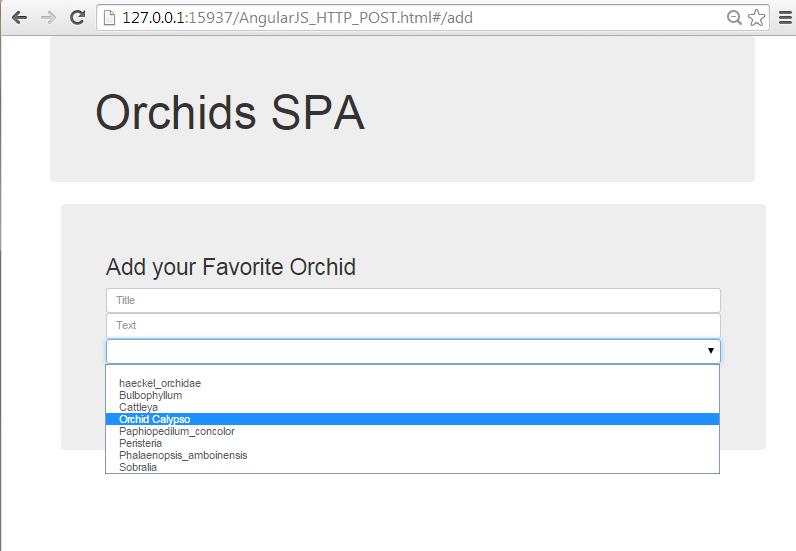
Here you can add a new item. This is how looks the list of pictures at the drop down list:
Save a flower, to see how it works:

Now you will see the "New orchid saved" message (provided that the web service is working properly).
Return to the "See all flowers" View (because this is a SPA Application, we're actually browsing to the SAME html web page):

Here we can see the new item that we added to the collection, and clicking the "Edit" icon, we'll edit it:

As you can see, the URL contains the ID of the item being edited. Make some changes, and click the "Update" button, to send an HTTP PATCH request to the OData REST service:

If you get no response, check at the Developer's Tools (F12) in the "Network" tab, for the response status. If there is some error , refer to this HTTP Error Tutorial.
After you updated your item, take a look at it on the items List:

Notice the "Msg" that we display here , in the "All" View.
Remember to widely using the $log functionality in your SPA, to send to yourself messages with some feedback from your AngularJS app.
Enjoy AngularJS.....
by Carmel Schvartzman
<<<< PREVIOUS LESSON NEXT LESSON >>>>
כתב: כרמל שוורצמן


